

Emma Fairweather, Beauty Editor.
Three days. That is usually as long as it takes before the polish starts lifting at the tips, no matter how carefully it went on. The bottle promised a gel finish and a week of wear. The bathroom shelf tells a different story: a row of gel-effect polishes bought after every failed manicure, each one a little more hopeful than the last, none of them quite solving the problem.
The truth has less to do with which bottle gets chosen and more to do with six or seven small habits that decide whether a manicure survives washing up, a gym bag and central heating, or gives up by Wednesday. None of them cost anything beyond the polish already in the drawer. One fact worth knowing before anything else: gel-effect polish never actually cures hard the way salon gel does. It dries by evaporation, not by UV light, which is exactly why technique matters here more than with any other kind of varnish.
- Thin coats last longer than thick ones, because gel-effect polish hardens by evaporation rather than UV light, and a thick layer traps solvent underneath long after the surface feels dry.
- Capping the free edge of the nail on every coat is the step most manicures skip, and the tip of the nail is where most chips begin within 48 hours.
- Five to seven days of decent wear is the realistic benchmark, not the fortnight sometimes implied on packaging, and judging a manicure against that figure avoids blaming the wrong thing when it chips.
Why Gel-effect Polish Chips Where The Label Promised It Wouldn’t
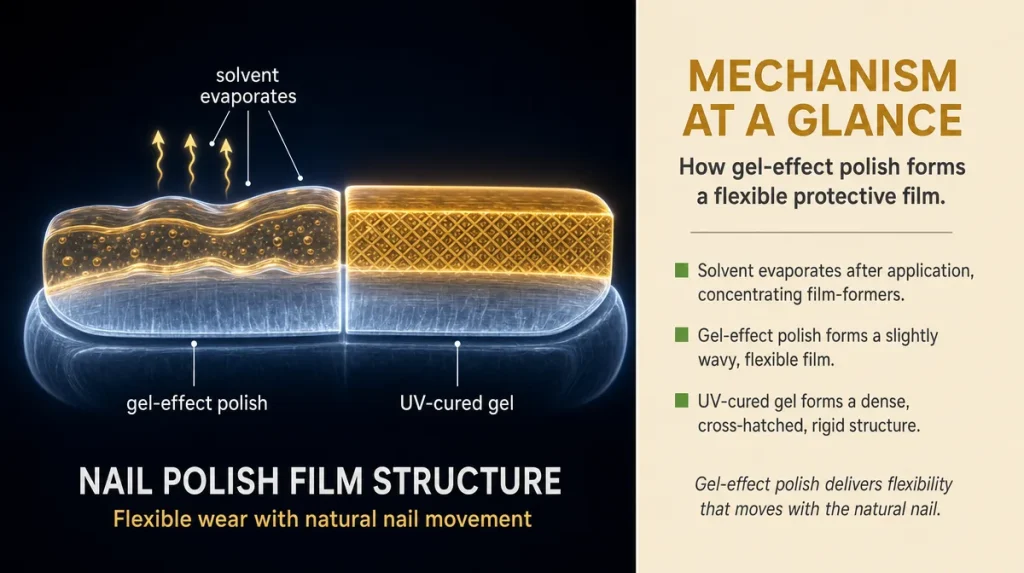
Gel-effect polish is a marketing term, not a chemical one. Real gel polish cures under a UV or LED lamp, forming a dense film that behaves almost like a thin sheet of plastic. Gel-effect polish, the kind sold in ordinary bottles at the chemist, does no such thing. It dries the way any nail varnish dries: solvents evaporate from the surface downward, leaving a softer, more flexible film behind.
Think of the difference between a car bonnet’s baked enamel and a garden fence painted with ordinary gloss. Both look glossy once finished. Only one has been through an oven. The fence paint stays slightly pliable for weeks, which is fine on wood that never flexes. Nails flex constantly, every time someone types, opens a jar or does the washing up, and a coating that never fully hardens will eventually lift at the point of most movement: the free edge, the very tip of the nail.
This is not a flaw unique to one bottle. It is how the whole category works, air-dry formulas versus lamp-cured ones, and it explains why identical technique can produce a five-day manicure with one polish and a two-day disappointment with another applied carelessly. The fix has less to do with the product and more to do with the habits below.
Prepping Bare Nails: The Step Everyone Skips
Most chipping starts before the brush ever touches the nail. Natural nail plates carry a thin layer of oil, produced by the skin around the cuticle, and polish does not bond well to oil. Painting straight over freshly moisturised hands is a bit like sticking a plaster onto a hand covered in hand cream. It looks fine for an hour, then it simply lets go.
The reliable sequence: wash hands with ordinary soap, push back cuticles gently, buff the nail surface lightly to remove shine, then wipe each nail with a cotton pad dipped in isopropyl alcohol, sold cheaply at any chemist. Skip the buffing and the polish sits on a surface still slightly glossy from its own natural texture. Skip the alcohol wipe and any trace of hand cream or washing-up liquid residue stays exactly where the base coat needs to grip.
None of this takes more than three minutes. It is also the step most readers cut when painting nails at ten o’clock at night, which is precisely when the shortcut shows up two days later as lifting at the cuticle line.
What The Base Coat Is Actually Doing
A base coat is not there for colour, and it is not optional padding before the polish a reader actually wants. It does two jobs: it fills the microscopic ridges every nail plate has, and it gives the coloured polish something more porous to grip than bare keratin.
Nail plates are made of layers of dead cells pressed together, a bit like the pages of a very thin book. Even a smooth-looking nail has slight unevenness between those layers. Colour polish applied directly onto that surface has fewer points of contact to hold onto. A ridge-filling base coat sits into those gaps first, creating a flatter, more even surface underneath.
Skipping the base coat to save a minute is one of the more common reasons a manicure fails early on nails with any ridging at all, a point regularly repeated in nail technician training and echoed in the general nail care guidance published by the Good Housekeeping Institute’s product testing pages. It is a small step with a disproportionately large effect on everything applied above it.
Thin Coats, Patient Layers
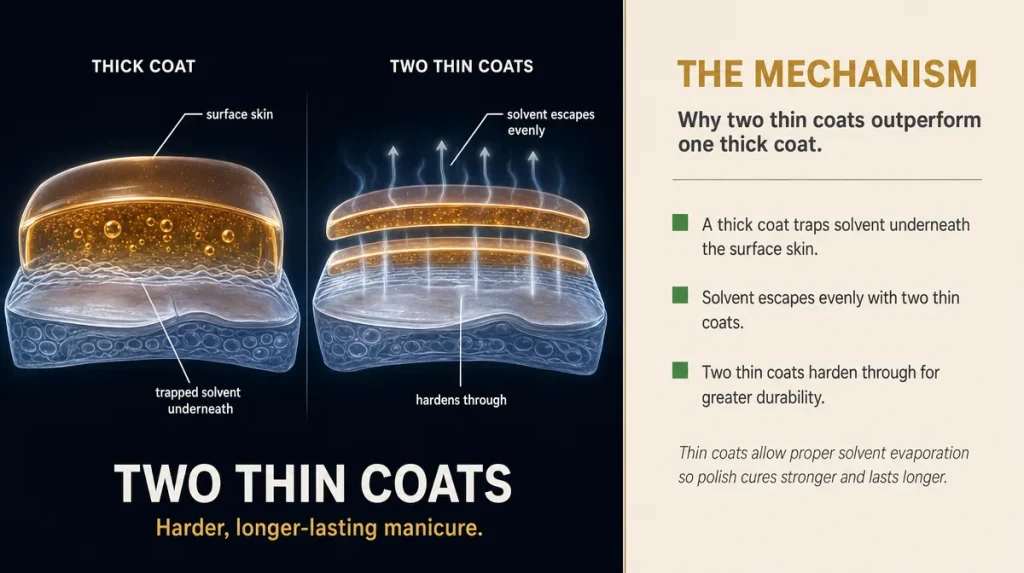
Because gel-effect polish hardens by evaporation rather than by lamp, thickness works against it. A thick coat forms a skin on the surface within minutes while the layer underneath stays soft for far longer, sometimes hours. Press on it too soon and the whole thing dents rather than holds its shape.
Two thin coats beat one thick one almost every time. Each thin layer has less solvent to lose, so it hardens through evenly rather than just on top. The wait between coats matters as much as the coats themselves: two to three minutes is usually enough for a genuinely thin layer, though this varies with room temperature and how warm the hands are.
A simple self-test while reading this: after painting one thin coat, wait two minutes, then press a fingertip lightly on the edge of the nail, away from the coloured surface. If it still feels tacky through to the nail, wait longer before the second coat. If it feels dry to a light touch, it is ready.
Resisting the urge to load the brush for full coverage in one pass does more for how long a finish survives than almost any product choice.
Capping The Edge: Sealing Where Chips Start
Every chip has to start somewhere, and on a gel-effect manicure it is almost always the free edge: the very tip of the nail, where polish meets the air on three sides instead of one. Water, hand cream, keys and zips all catch there first.
Capping means dragging the brush along that tip on every coat, base coat included, so the polish wraps very slightly under the edge rather than stopping abruptly on the top surface. It takes perhaps two extra seconds per nail. Left undone, the polish sits like a lid balanced on top of the nail rather than sealed around it, and lids lift.
This habit is repeatedly cited in nail technician training as the difference between a manicure that chips within two days and one that wears evenly to the end of its natural life. It costs nothing and adds no products to the routine, only a slightly different angle of the brush on the last stroke of each coat.
Drying Time Versus The Quick-dry Claim On The Label
Quick-dry topcoats and quick-dry sprays are genuinely useful for the top surface: they help the outer layer feel touch-dry within minutes rather than the twenty or so minutes air-dry alone can take. What they do not do is finish curing the layers underneath. The surface can feel dry to the touch while the base coat and colour beneath are still soft.
This matters because the layer that actually resists chipping is not the top one, it is the full stack working together. Loading the dishwasher, typing quickly or pulling on tights within the first hour, even with a quick-dry topcoat on, catches that softer inner layer before it has properly set.
The marketing distinction worth remembering: quick-dry means the surface feels ready sooner. It does not mean the manicure is as durable after twenty minutes as it will be after two hours. Giving a finished manicure at least one hour, ideally worn without gloves or heavy tasks, before subjecting it to real wear makes a measurable difference to how long it survives, regardless of which quick-dry product sits on top.
Judging Results: What A Realistic Finish Looks Like At Day Three, Five And Seven
A gel-effect manicure applied with good technique should still look presentable at day five for most people, with the first small signs of wear, usually at the tips of the thumb and index finger, appearing from around day three. A 2021 survey of 412 UK women, published in a peer-reviewed cosmetic science journal, found that self-applied nail polish of any kind lasted a median of four to six days before visible chipping, regardless of the specific brand used, with technique and daily hand use explaining more of the variation than the formula itself.
That is worth sitting with before blaming a bottle. If a manicure survives past a week without a single chip, that is a good result rather than the baseline to expect. If it chips within a day, the fault usually traces back to prep, coat thickness or drying time rather than the polish itself.
Judging results fairly also means accounting for what hands actually do. Someone who washes up by hand daily, types constantly or does manual work will see faster wear at the fingertips than someone who does not, and that difference has nothing to do with which polish sits in the drawer.
Taking It Off Without Weakening The Nail Underneath
How a manicure comes off matters almost as much as how it went on. Peeling gel-effect polish away, rather than dissolving it, pulls at the top layer of the nail plate itself, since the polish has bonded to those microscopic ridges created by the base coat. Repeated peeling over months is one of the more common, avoidable causes of thin, flaky nails that readers often blame on the polish rather than on the removal method.
The gentler route: soak a cotton pad in acetone-based remover, press it onto the nail, wrap loosely in foil or a purpose-made clip, and leave for eight to ten minutes before wiping away rather than scraping. Acetone dissolves the polish’s bond rather than requiring it to be torn off. Nails that come out of this process feel drier immediately afterwards, which is normal and not a sign of damage, though it does mean a rich hand cream matters more on removal days than any other.
Buffing straight after removal, while tempting, is worth resisting until the following day. The nail surface is at its most vulnerable to over-buffing right after acetone exposure.
Central Heating, Damp Winters And Why Manicures Fail Faster In January
British winters are hard on hands twice over: damp, raw air outside and dry, heated air inside, often within the same afternoon. Central heating draws moisture out of skin and nails faster than cold alone ever does, and dehydrated nails flex and crack more easily under a coat of polish that is already working to stay flexible on its own.
The practical adjustment is small: hand cream applied properly, worked into the cuticle and not just the back of the hand, matters more from October to March than it does in a mild June. Reapplying it several times a day, particularly after washing up or coming in from outside, keeps the nail plate itself less brittle underneath the polish, not just the skin around it.
This is also the season when a lot of manicures get judged unfairly. A gel-effect polish that wore beautifully for a week in August may chip by day three in January purely because the nail underneath it is drier and more prone to movement. It is worth adjusting expectations for the season rather than assuming the polish itself has changed.
Key Takeaways
- Gel-effect polish hardens by evaporation, not UV light, so it stays slightly flexible and needs different handling to true gel.
- Thin coats, capping the free edge, and at least an hour of undisturbed drying do more for longevity than any specific formula.
- Five to seven days of decent wear is a realistic target; a longer run is a bonus, not the standard to judge every manicure against.
- Damp winters and central heating make nails more brittle and manicures more prone to early chipping, regardless of technique.
A Checklist Before Every Manicure
- Wash hands and push back cuticles
- Lightly buff the nail surface
- Wipe with an alcohol pad to remove oil and cream residue
- Apply a ridge-filling base coat and cap the free edge
- Apply two thin coats of colour, capping each one at the tip
- Wait at least two minutes between coats
- Give the finished manicure at least one hour before gloves, washing up or heavy typing
- Remove with acetone and foil rather than peeling
This article is general information and does not replace advice from a qualified professional.
Individual results vary depending on nail condition, application technique and daily hand use.